Hangfire Docker with Multiple Servers
I’ve been using Hangfire for almost 2 years. It’s a wonderful job schedule API with persistent storage. Community have a lot of examples about how to use Hangfire. However, almost all of them use the application (UI) as a hangfire server. Here, I will explain how to use Hangfire with docker and multiple servers. Let’s begin.
UI
First, let’s create an API. I will show my example on ASP.NET Core 2.2 with PostgreSQL. Open your terminal.
$ mkdir Hangfire.UI
$ cd Hangfire.UI
$ dotnet new webapi
Then we need the Hangfire packages.
$ dotnet add package Hangfire.Core
$ dotnet add package Hangfire.AspNetCore
$ dotnet add package Hangfire.PostgreSql
Open Startup.cs and add those lines into ConfigureServices
services.AddHangfire(configuration => configuration
    .SetDataCompatibilityLevel(CompatibilityLevel.Version_170)
    .UseSimpleAssemblyNameTypeSerializer()
    .UseRecommendedSerializerSettings()
    .UsePostgreSqlStorage(Configuration.GetConnectionString("HangfireConnection")));
Next, open appsettings.json and add the connection string
"ConnectionStrings": {
  "HangfireConnection": "Server=postgresql;Port=5432;Database=demo;User Id=demo; Password=111111;"
}
Don’t change the server part of connection string, PostgreSQL will be exposed with that name.
Next and the most important thing, dashboard settings. By default, dashboard can only be reached by localhost. Since we are using docker, it will stay in the image. Therefore, we have to expose the dashboard. Open Startup.cs and copy following code.
/* Configure method */

....

app.UseHangfireDashboard("/hangfire", new DashboardOptions()
{
    Authorization = new[] { new AllowAllConnectionsFilter() },
    IgnoreAntiforgeryToken = true
});

....

public class AllowAllConnectionsFilter : IDashboardAuthorizationFilter
{
    public bool Authorize(DashboardContext context)
    {
        // Allow outside. You need an authentication scenario for this part.
        // DON'T GO PRODUCTION WITH THIS LINES.
        return true;
    }
}
As I mentioned in the code, do not use this code in the production directly. You have to create your own scenario (e.g. only admin roles can reach hangfire.). Also, we have disabled anti forgery token for now, the security is not our first concern here. UI part is done.
Background Server
Secondly, we need a separate background server project. Create this project besides Hangfire.UI project.
$ mkdir Hangfire.Server
$ cd Hangfire.Server
$ dotnet new console
Run following package commands
$ dotnet add package Hangfire.Core
$ dotnet add package Hangfire.PostgreSql
The console must stay alive, all the time. Therefore we will use one of the best solutions of .NET CoreHostBuilder.
static async Task Main(string[] args)
{
    GlobalConfiguration.Configuration.UsePostgreSqlStorage("Server=postgresql;Port=5432;Database=demo;User Id=demo; Password=111111;");

    var hostBuilder = new HostBuilder()
        // Add configuration, logging, ...
        .ConfigureServices((hostContext, services) =>
        {
            // Add your services with depedency injection.
        });

    using (var server = new BackgroundJobServer(new BackgroundJobServerOptions()
    {
        WorkerCount = 1
    }))
    {
        await hostBuilder.RunConsoleAsync();
    }
}
We are setting the connection string and creating a background server with respect to it. I have setWorkerCount as 1 for demonstration, you can use Environment.ProcessorCount * 5 at production. Also, BackgroundServerOptions class has a Activatorproperty which allows you to use Dependency Injection with your jobs (e.g. Example).RunConsoleAsync will suspend the main thread and prevent the server termination.
Output of the Background Server;
hang.server1\_1  | Application started. Press Ctrl+C to shut down.
hang.server1\_1  | Hosting environment: Production
hang.server1\_1  | Content root path: /app/
Jobs
The UI and Server projects must share the same code base for the Jobs. Therefore, I will create a new library project beside those projects.
$ mkdir Hangfire.Jobs
$ cd Hangfire.Jobs
$ dotnet new classlib
A sample job using Thread.Sleep(ms)
public class MyJob
{
    public void DoJob(int sleep)
    {
        Thread.Sleep(sleep);
    }
}
This common project can be added to the UI and Server projects with following command.
$ dotnet add reference ../Hangfire.JobsWe are done with the infrastructure. Additionally, we need to enqueue the example job (MyJob). At Hangfire.UI there should be ValuesController where you can put an example job there. Or you can create your own controller for jobs.
[ApiController]
public class ValuesController : ControllerBase
{
    private readonly IBackgroundJobClient _client;

    public ValuesController(IBackgroundJobClient client)
    {
        _client = client;
    }
    // GET api/values
    [HttpGet]
    public ActionResult<IEnumerable<string>> Get()
    {
        Random rnd = new Random((int)DateTime.Now.Ticks);
        _client.Enqueue<MyJob>(i => i.DoJob(rnd.Next(10000, 20000)));

        return new string[] { "value1", "value2" };
    }

    .....
}
The above code will enqueue the example job with random interval when anyone hit the Get() action.
We are done with the codebase. We have separated the Hangfire Background Server and Dashboard, and created a common class library for jobs. What we have to do in the next part is, dockerize the projects and create environment with those containers.
Docker
Since, the both UI and Server projects are .NET Core 2.2 projects. The Dockerfile should be almost same. (I tried my best while creating these dockerfiles). Hangfire.UI ‘s Dockerfile is shown below. Open a new file named Dockerfile and copy following commands into it.
FROM microsoft/dotnet:2.2-aspnetcore-runtime AS base
# /app directory is the where the binary files are will be present
WORKDIR /app
# Output port for the ASP.NET Core
EXPOSE 80

# Start to build
FROM microsoft/dotnet:2.2-sdk AS build

# Copy all source files to /src folder
# This is necessary for solutions. (Multiple projects, also you can define this by specifying projects)
COPY ./ /src
WORKDIR /src

RUN dotnet restore "Hangfire.UI/Hangfire.UI.csproj"
RUN dotnet build "Hangfire.UI/Hangfire.UI.csproj" -c Release -o /app

# Rename the image as publish
FROM build AS publish
RUN dotnet publish "Hangfire.UI/Hangfire.UI.csproj" -c Release -o /out

# Building the project is done. We need the runtime image.
FROM base

# Go back to /app
WORKDIR /app

# Copy all published files into /app folder
COPY --from=publish /out .
ENTRYPOINT ["dotnet", "Hangfire.UI.dll"]
Only difference between UI and Server is EXPOSE 80 command on the file. The server project does not need any TCP port exposing.
Since we obtained multiple dockerized applications, we are almost done. Next, run the images using docker-compose command.
Docker-Compose
Docker-compose creates an environment which run multiple images and enables them to communicate with each other. Go to main folder and create docker-compose.yml file and copy following content into it.
version: '3.4'

services:
  postgresql:
    image: 'bitnami/postgresql:latest'
    ports:
      - '5432:5432'
    environment:
      - POSTGRESQL_USERNAME=demo
      - POSTGRESQL_PASSWORD=111111
      - POSTGRESQL_DATABASE=demo
    volumes:
      - pgdata:/bitnami
    networks:
      - svcnw

  hang.ui:
    image: hangui
    restart: always
    build:
      context: .
      dockerfile: ./Hangfire.UI/Dockerfile
    ports:
      - '5005:80'
    networks:
      - svcnw
    depends_on:
      - postgresql

  hang.server1:
    image: hangserver1
    restart: always
    build:
      context: .
      dockerfile: ./Hangfire.Server/Dockerfile
    networks:
      - svcnw
    depends_on:
      - postgresql
      - hang.ui

  hang.server2:
    image: hangserver1
    restart: always
    networks:
      - svcnw
    depends_on:
      - postgresql
      - hang.ui
      - hang.server1

volumes:
  pgdata:

networks:
  svcnw:
    driver: bridge
The compose file has a network namesvcnw . This network will connect the images with each other. On the other hand, the dependency between images should be in a particular order.
PostgreSQL > UI > Servers.
Docker-compose up multiple servers which are called as hang.server1 and hang.server2. Server 2 will use the same image with Server 1, therefore we can up more than one server using the same image. Keep in mind that using docker-compose is not ideal in every scenario, we need an orchestrator such as Kubernetes so that the number of servers can be increased on demand easily.
Let’s see the results. Go to project’s root folder and run
$ docker-compose up --buildThe docker-compose will build all images and run them. Next, you can go to
http://localhost:5005/hangfire

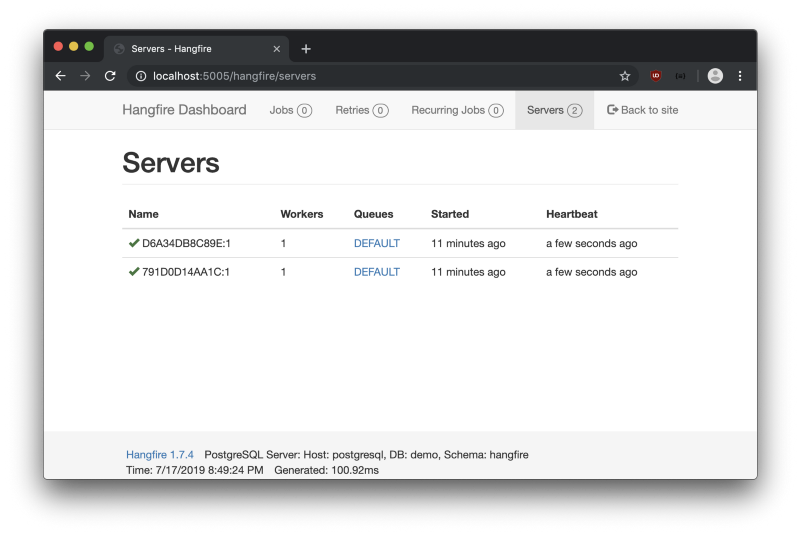
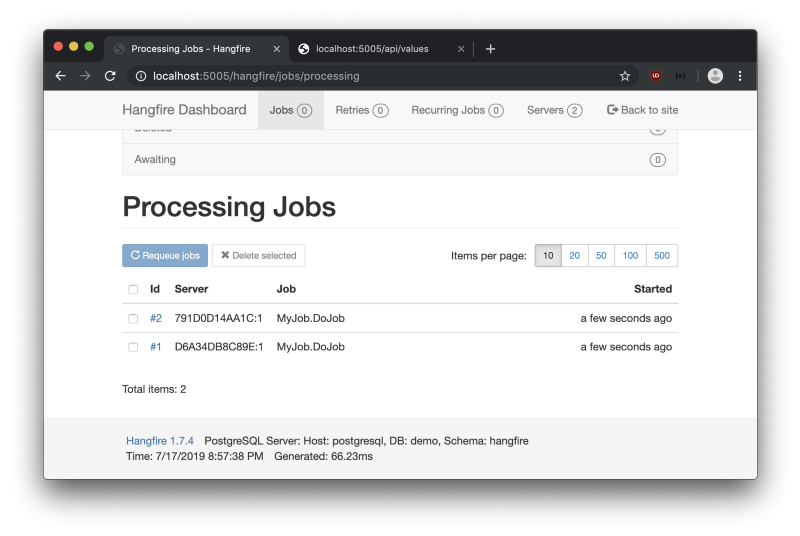
As you can see here, there are two servers running. Let’s try the job scheduling. Load twice the following endpoint http://localhost:5005/api/values to enqueue new jobs.

The image shows that jobs are distributed to the servers. Remember, we have set the worker count to 1 above.
Conclusion
In this post, we have successfully showed how to run multiple Hangfire servers using docker images. We have separated the UI and Server part of the Hangfire, also dockerized those applications. To make it clear, you should distribute your Hangfire servers with kubernetes or service fabric. It is important to use advantages of the distributing jobs and dockerizing. See you in next post.
You can get the source files below.
alimozdemir/Hangfire.Docker
_An experimental hangfire docker project with multiple servers (workers) - alimozdemir/Hangfire.Docker_github.com
References
Documentation - Hangfire Documentation
_Hangfire keeps background jobs and other information that relates to the processing inside a persistent storage…_docs.hangfire.io